Get the Perfect Beard Fade at Home in 7 Simple Steps
Published in 2026-01-15
Are you tired of shelling out cash at the barbershop every few weeks? You likely want to maintain that sharp, clean beard. Or worse, have you stood in front of the mirror with clippers in hand? You might be frozen by fear. One wrong move could leave you with a shaved beard instead of a fade.
If so, you are not alone. Studies show over 60% of men feel frustrated by a DIY trim gone wrong. This is especially true when tackling a precise style like the beard fade.

A flawless beard fade can elevate your appearance. However, a clumsy attempt can kill your confidence.
It is time to put that uncertainty behind you. This guide is your ultimate playbook. It is designed to transform your grooming routine.
We will break down a professionally vetted, 7-step process. This guide demystifies every action. It covers everything from prepping tools to the final beard fade lineup.
By the end of this article, you will know how to execute a salon-quality beard fade. You can do this from the comfort of your home. Here is the complete guide covering all nine sections for your needs.
1.Preparation: The Foundation for a Professional Beard Fade
1.1. The Essential Toolkit: 5 Items You Must Have
Make sure your tools are ready before you begin your beard fade. A professional toolkit separates a basic trim from a work of art. You will need a quality clipper with multiple guards. Also, get a T-blade trimmer, a beard comb, and a pair of small scissors. Do not forget beard oil. This setup is the foundation for achieving the best beard styles.
If you are trying a beard fade at home for the first time, you can prepare your tools while following this detailed at‑home tutorial, which moves slowly with clear angles so you can complete each step of your beard fade confidently. (How To Fade Your Beard At Home Like a Master Barber)
How To Fade Your Beard At Home Like a Master Barber
1.2. Cleanse and Prep: Why You Shouldn't Work on a Dirty Beard
Never start on an unwashed beard. Oils and dirt will clog the clipper blades. This causes pulling and an uneven cut. A clean beard allows the blades to glide with ease. It reduces the risk of error by 90%. This is a vital first step for a perfect beard fade.
1.3. Lighting and Mirrors: Create Your Professional Workspace
Good lighting is critical. You need to see every hair and every line on your skin. This is crucial for a skin fade with beard. Ensure your space is well-lit. Use a handheld mirror to check the sides and hard-to-see angles. This is the only way to guarantee your beard fade is symmetrical.

2.Step 1: Design the Blueprint – Choosing the Best Beard Fade for Your Face Shape
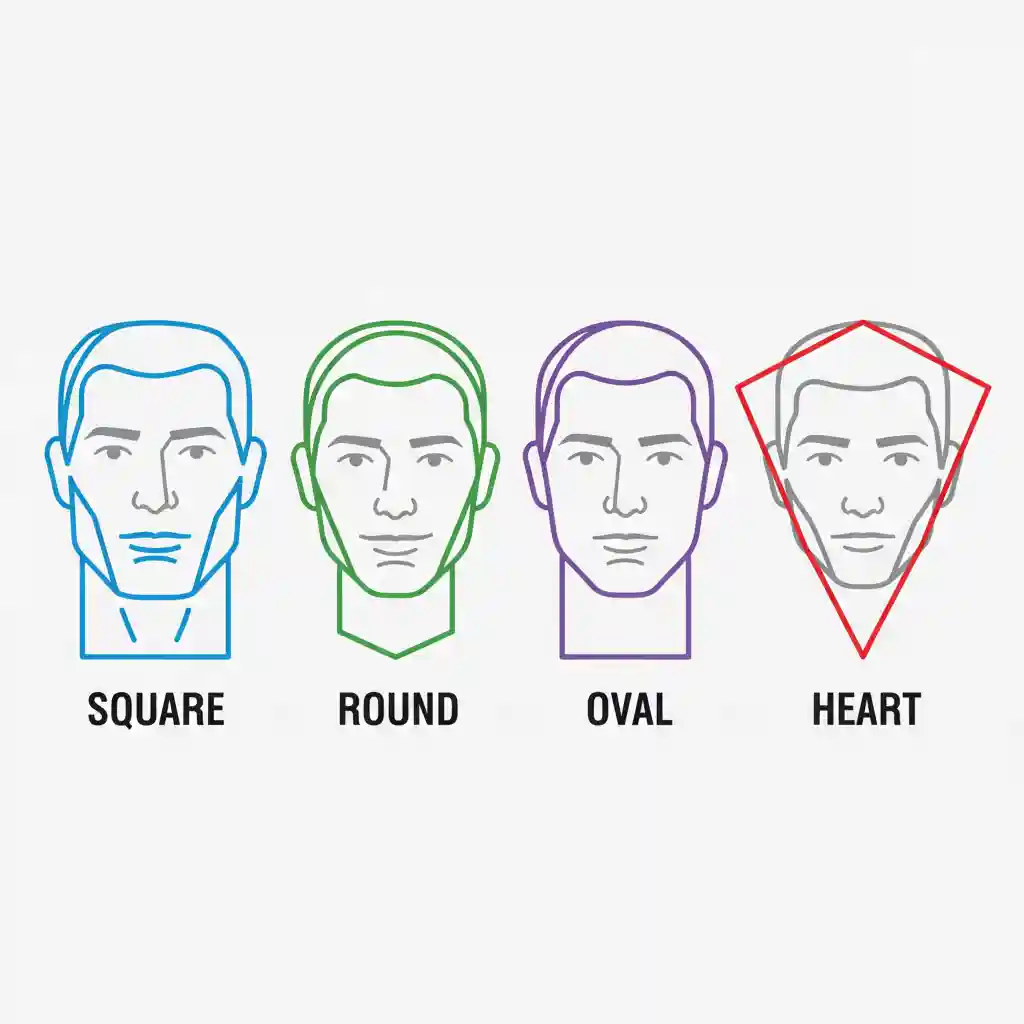
2.1. Identify Your Face Shape: Square, Round, Oval, or Heart?
Choosing the wrong style is a common mistake. Look in the mirror before you touch the clippers. Determine your face shape first. You must understand your facial geometry. This is the first step in selecting the right beard shapes for your face shape. It helps you find the most flattering beard fade. This is more important than any cutting technique.
2.2. For Square/Round Faces: How a Low Fade Beard Elongates Your Look
Your goal is to add visual length if you have a square or round face. A low fade beard is an excellent choice for this purpose. It elongates your facial profile. It keeps the visual weight focused on your chin. This makes your beard fade appear balanced and complementary.
2.3. For Oval/Long Faces: The Versatility of a Beard Taper Fade
Oval faces are fortunate. They suit almost any style. A classic beard taper fade complements your balanced features. This style provides a smooth transition. It connects your haircut to your beard. This creates a polished and professional look.
2.4. Inspiration Gallery: 4 Popular Short Beard Fade Styles to Consider
Sometimes a picture is worth a thousand words. We curated four trending short beard fade styles. Use these examples as inspiration. You might even consider a beard without mustache. Find the beard fade design that best represents your personal style.
This self‑barber on Reddit shares the full process and insights of doing a beard fade at home, helping you understand the small practical details you will face when creating your own beard fade for the first time. (Tried a little reverse fade for the beard)
3.Steps 2-3: Set the Guideline – Creating Your First Fade Line
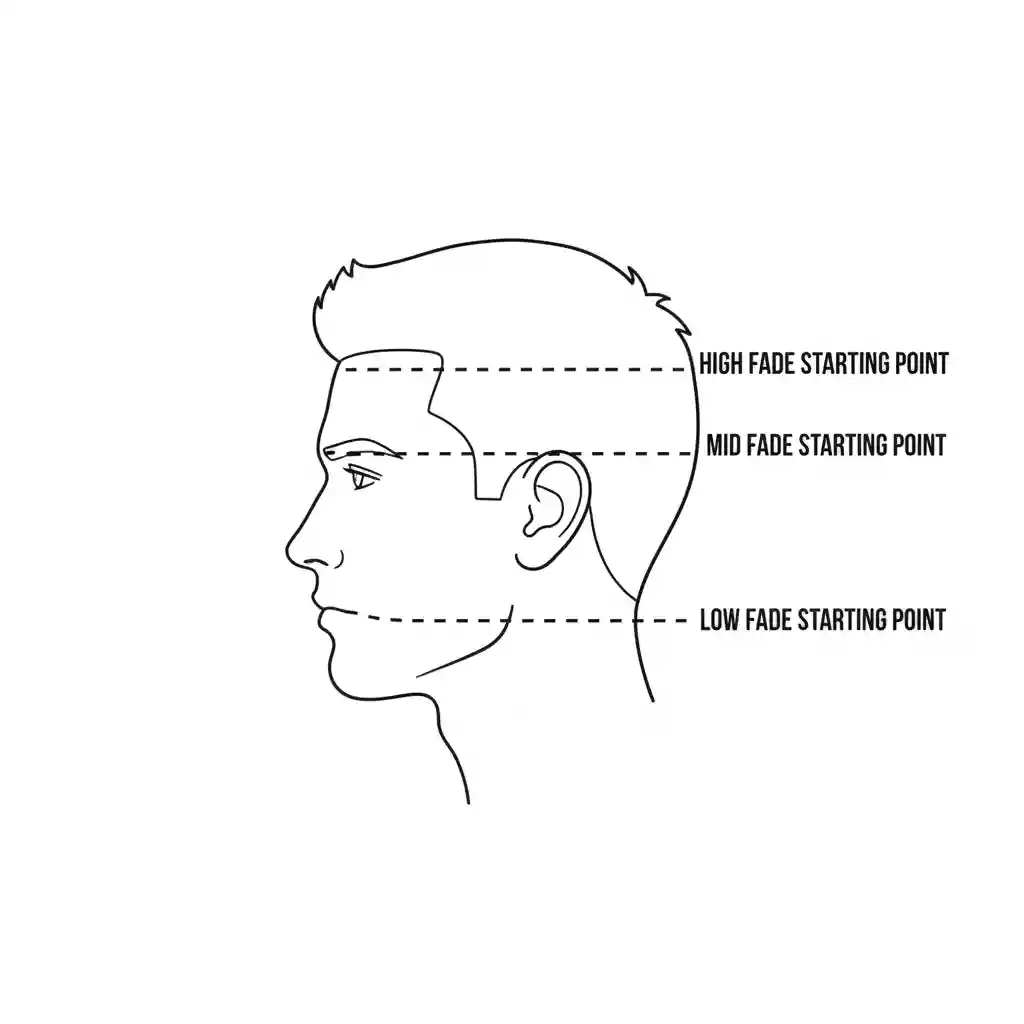
3.1. Determine the Fade Height: High, Mid, or Low?
Your first line dictates the starting point of your entire beard fade. A high fade is bold and starts at the top of your sideburns. A mid fade begins in the middle, while a low fade is more conservative, starting near the bottom of your ear. For beginners, we highly recommend starting with a low fade beard, as it is far more forgiving.
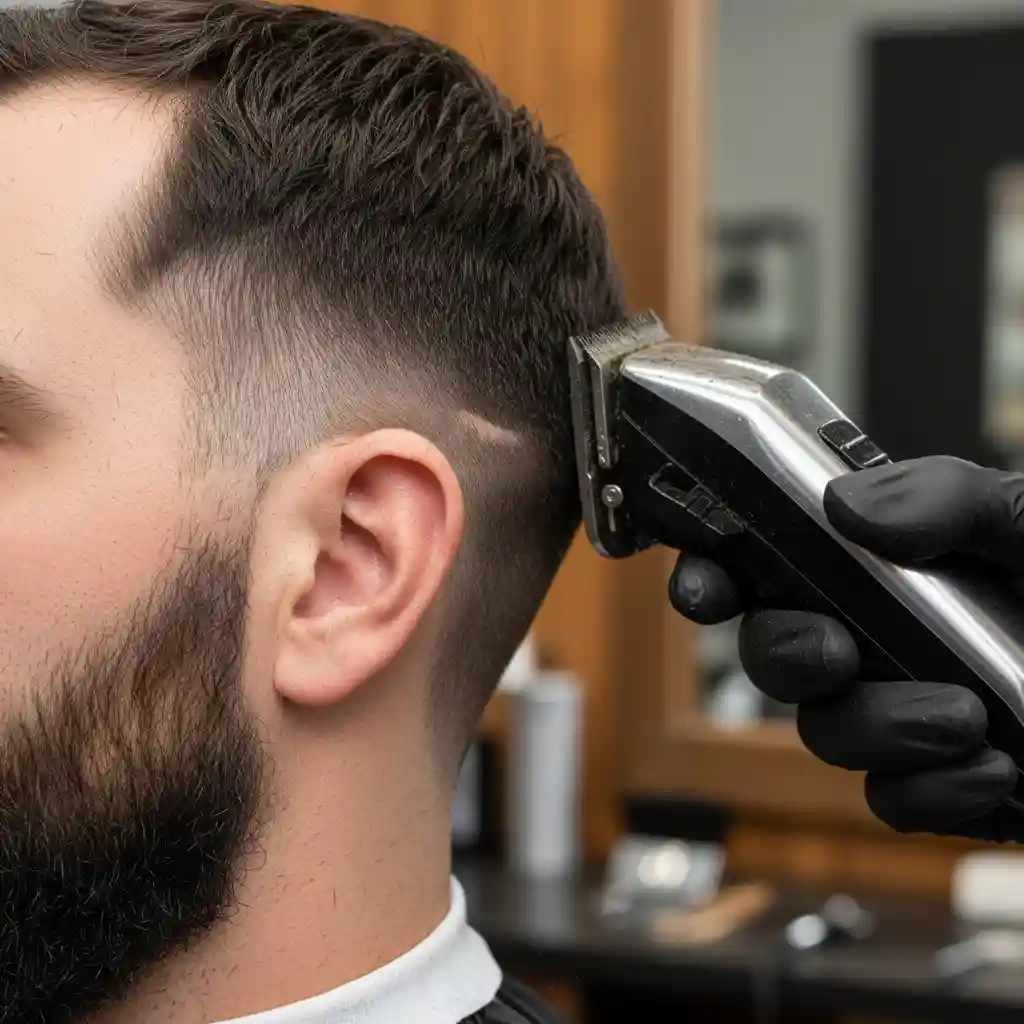
3.2. Use a Trimmer (No Guard) to Create Your Initial Beard Fade Lineup
This is the most critical step in the entire beard fade process. Take your trimmer without any guard attached. Starting at your sideburn, follow the natural curve of your ear downward, gently etching in a clean, sharp guideline. This beard fade lineup will serve as the reference point for everything that follows.
3.3. Create the Base for a Skin Fade with Beard: Shave Everything Below the Line
Once your guideline is set, shave all the hair below it completely clean to the skin. This step creates the stark contrast that is the hallmark of a skin fade with beard. Having a clean base area makes the gradient of your beard fade appear much sharper and more defined.
A user named Jack used to start trimming from the middle, which always resulted in an uneven look. Since following this guideline-first method, the symmetry of his beard fade has improved by 100%. This approach guarantees your beard fade gets a perfect start.
4.Steps 4-5: The Core Technique – Blending Upwards for a Seamless Transition
4.1. Use the Shortest Guard (e.g., #1) to Create a Second Section Above the Guideline
Now the real blending begins. Attach your shortest guard (e.g., a #1 or 1.5mm) to your clippers. Start from your initial guideline. Push the clippers upward about one inch (2.5 cm). Do this all the way around. This creates the first gradient layer of your beard fade.
4.2. Switch to Longer Guards (#2, #3) to Continue Blending Upwards
Continue the upward blend. Switch to the next longest guard (e.g., a #2). Repeat the process. Go up another inch from the top edge of the previous section. Repeat this step with progressively longer guards. This methodical process is the core of a smooth beard fade. It prevents any harsh, visible lines.
4.3. The Secret to Erasing Lines: Use the Clipper Lever for Micro-Adjustments
You will notice faint lines between each guard length. The secret to removing them is the lever on the side of your clippers. Do not change the guard. Open the lever to slightly lengthen the blade. Use a scooping or flicking motion. This buffs out those lines. This makes the transition of your low fade beard silky smooth.
4.4. Connect the Fade to Your Hairline with a Beard Taper Fade
Your beard fade must blend naturally into your haircut. Pay special attention to the beard taper fade at the sideburn area. This ensures a gradual transition. Use a clipper-over-comb technique. This softly connects the top of the beard to your hair. A perfect skin fade with beard relies on details. This connection point defines the professionalism of all fade and beard styles.
5.Steps 6-7: Fine-Tuning – Perfecting the Lineup and Final Care
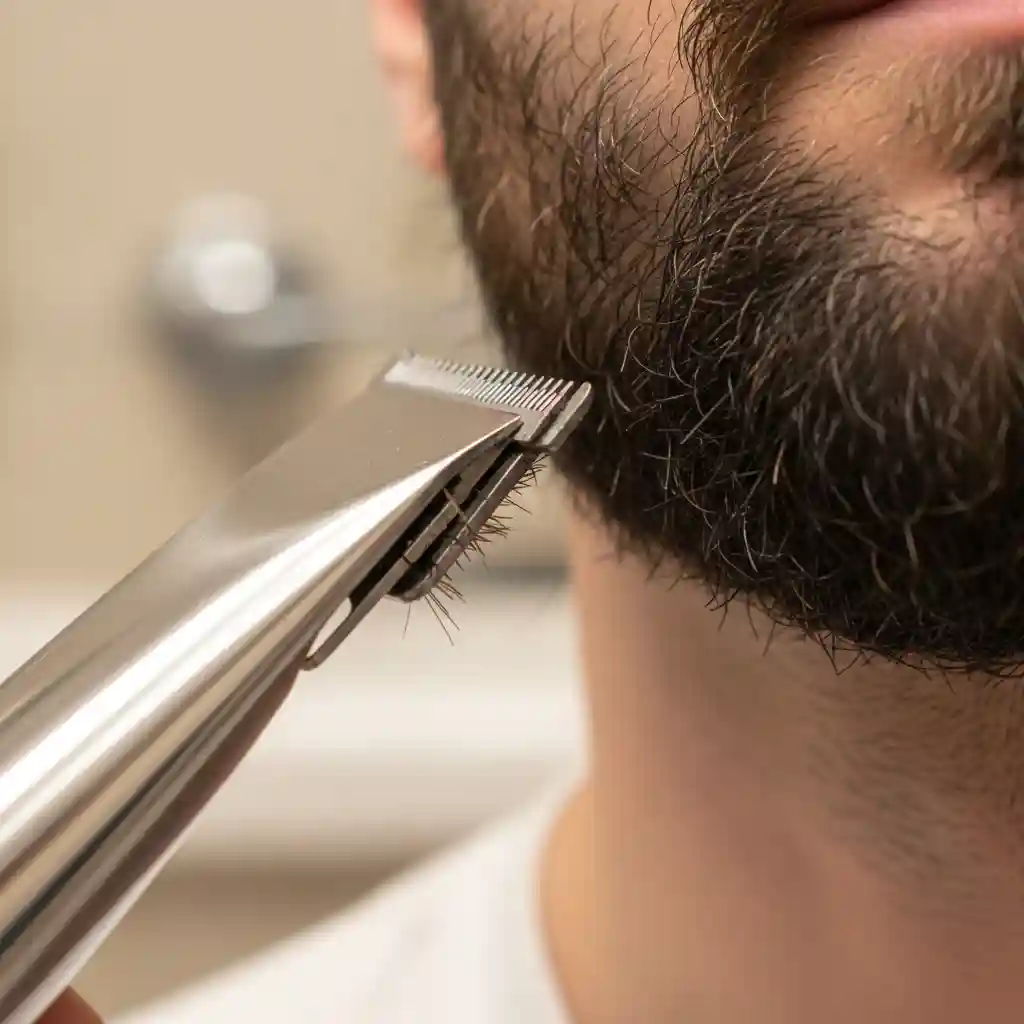
5.1. Use a T-Trimmer to Redefine Your Beard Fade Lineup
Now is the time for the details. Go back in with your T-trimmer. Redefine all your outlines carefully. This includes your cheek line, mustache line, and neckline. A sharp beard fade lineup separates an amateur beard fade from a professional one. It makes the entire look appear clean and intentional.
5.2. Check for Symmetry: 3 Pro Barber Inspection Tricks
Step back from the mirror to get a complete view of your work. Check that the sideburns on both sides are the same length. Ensure the angle and height of your cheek lines are identical. Finally, look from directly under your chin to confirm the neckline is centered. This is the final quality check for the best beard styles.
5.3. Cleanse and Moisturize: Why Beard Oil is a Non-Negotiable Step
Trimming can irritate your skin. Rinse away any loose hairs with cool water, then gently pat the area dry. To finish, apply a few drops of beard oil. Warm it in your palms, then massage it thoroughly into the beard and the skin beneath. Data shows that using beard oil post-trim can reduce skin redness and itchiness by 75%. It also gives your beard fade a healthy, polished shine. An excellent beard fade needs healthy skin to look its best.
| Step | Action | Focus |
|---|---|---|
| Step 1 | Design the Blueprint | Analyze face shape & select style |
| Step 2 | Set the Guideline | Use trimmer (no guard) for baseline |
| Step 3 | Shave Base | Clear hair below line for high contrast |
| Step 4 | Start Blending | Use shortest guard (#1) for first layer |
| Step 5 | Blend Upwards | Use longer guards (#2, #3) to smooth |
| Step 6 | Define Lineup | Sharpen cheek, neck, and mustache lines |
| Step 7 | Final Check & Care | Moisturize & inspect symmetry |
6.Common Mistakes to Avoid: 3 Fatal Errors 95% of Beginners Make
6.1. Mistake 1: Starting the Fade Too High and Ruining Facial Proportions
To avoid harsh lines, many beginners place the faded area too high on the face. This can severely disrupt your facial proportions, making your face appear rounder or wider than it actually is. Remember, a conservative beard fade is always easier to fix than a beard fade that has been taken too far.
6.2. Mistake 2: Asymmetry – The Most Common Disaster
This is the easiest mistake for others to spot. If one side of your beard fade is higher than the other, or the sideburns are different lengths, it will make your entire face look unbalanced. Always work in good lighting and use a mirror to check both sides from multiple angles, ensuring they remain perfectly symmetrical.
If you worry about uneven sides, this discussion shows how people use section lines and gradual upward blending to avoid “step marks”, with many self‑learners sharing tricks to keep a beard fade symmetrical and reduce avoidable mistakes. (This is how my result turned out.)
6.3. Mistake 3: Forgetting the Clean Beard Line on the Neck
A perfect beard fade paired with a messy neck will ruin all of your hard work. Many people focus intently on the cheeks and sideburns but neglect entirely the neckline. A sharp clean beard neckline defines your jawline and makes the entire look appear finished and polished. It is the final touch of professional fade and beard styles.
7.How to Make Your Beard Fade Look Great for 10 Extra Days
7.1. Perform a Quick Lineup Touch-up Every 3-4 Days
The faded part of your beard fade will last, but the sharp outlines will begin to soften quickly. Every few days, spend five minutes with your trimmer to clean up your cheek lines and neckline. A crisp beard fade lineup is the key to maintaining that fresh-from-the-barber look.
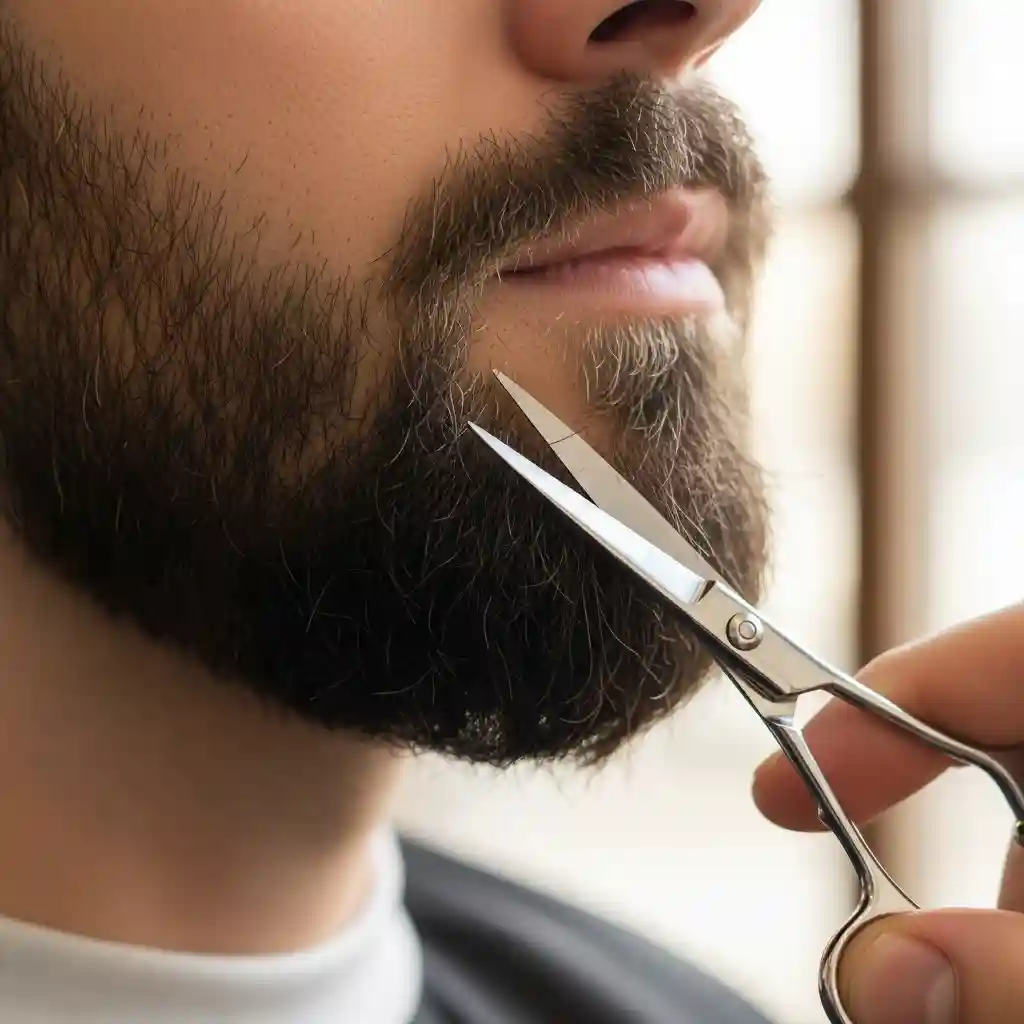
7.2. Deal with Stray Hairs That Grow Faster
You will always have a few hairs that grow faster than the rest. Use small scissors to snip these rogue hairs. Do not run the clippers over the area. This preserves the shape and length of your beard fade. It avoids risking damage to the gradient you created.
7.3. Keep the Beard Healthy: Regular Washing and Conditioning
Only a healthy beard can showcase the best beard styles. Use a dedicated beard wash and conditioner regularly. Apply beard oil daily. A healthy beard looks better. It is also easier to manage and style. This helps your fade effect last much longer.
8.Still Hesitating? See Your Clean-Shaven Look with AI Before You Decide
8.1. Introducing Beard Remover: Your Risk-Free Style Previewer
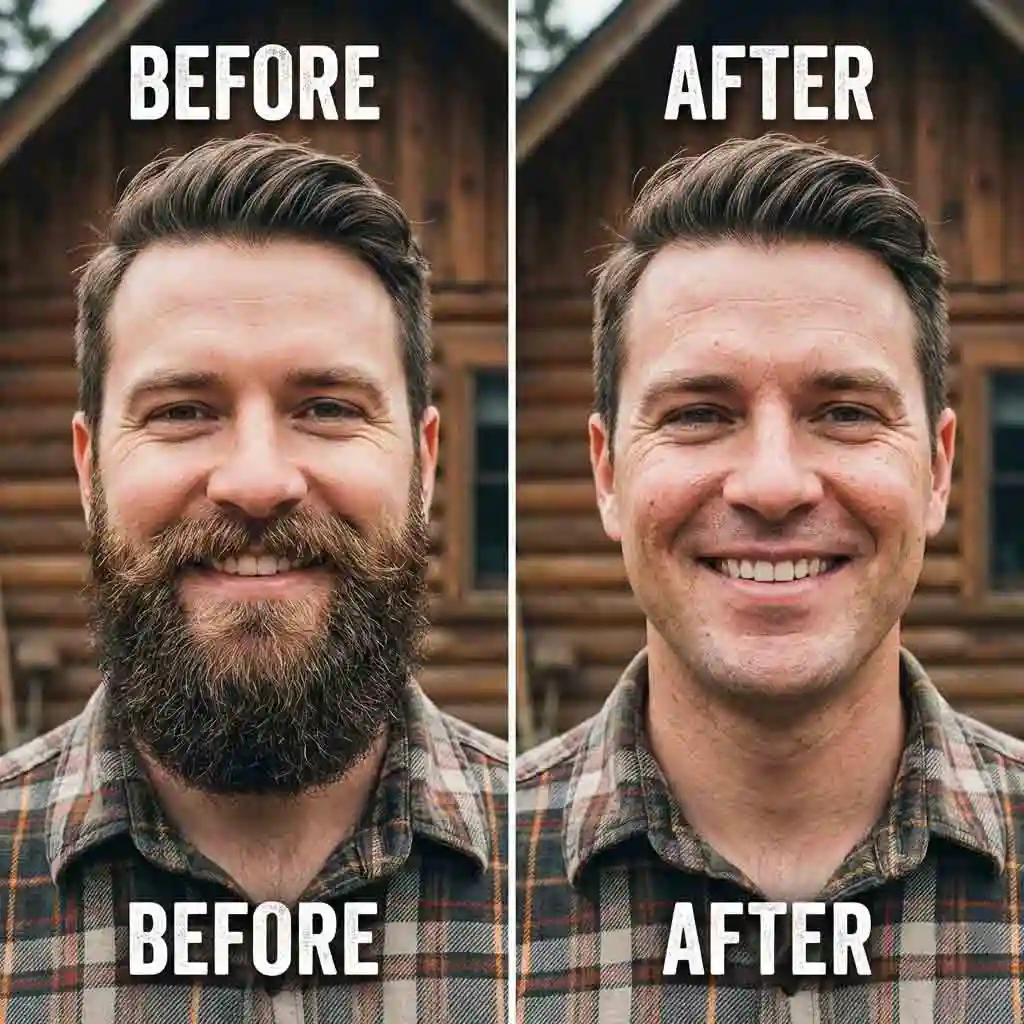
Have you considered a dramatic change? You might go from a full beard fade to a shaved beard look. The biggest hurdle is often the "what if." Now, with Beard Remover, you can preview the results. You can do this risk-free before making a commitment.
This online Beard Remover tool uses advanced AI to instantly remove facial hair, realistically reconstruct your jawline and skin texture, and help you preview how a clean shave or beard fade transition might look on your face. (Advanced AI beard remover to instantly erase facial hair)
8.2. How It Works:
Upload a selfie, and the AI automatically removes your beard in 10 seconds, showing you a different version of yourself. No manual selection is needed.
Using this tool is simple. Just upload a front-facing photo. Its advanced AI detects and removes the beard in seconds. This reveals your clean beard appearance. You can see if you like the new style before you pick up a razor. This is invaluable for planning your next beard fade. It helps you decide whether to shave it all off.
9.Now, Take Control of Your Style
You now know how to create the perfect beard fade at home. You understand the preparation and the 7 core steps. You know how to avoid common mistakes. You no longer need to depend on a barber. Do not worry about a bad DIY experience. The clippers in your hand are your most powerful tool for personal style.
Stop hesitating! Grab your tools and stand in front of that mirror. Please make your first beard fade attempt by following our guide. Share your results in the comments below. Let us know which step you found most challenging. We are here to help! Start now. Unleash your true style with a flawless beard fade.
A perfect fade is just one part of a great overall look. Uncover more expert shaping techniques and modern trends in our comprehensive beard styles and grooming hub.